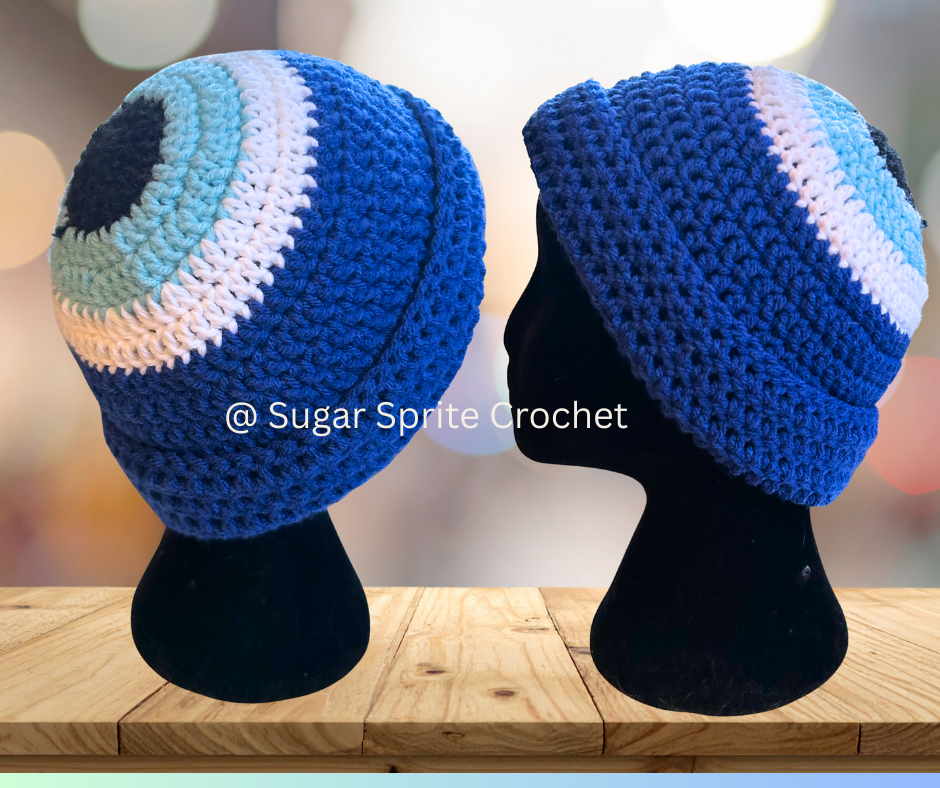
Origins of the Evil Eye
The Evil Eye is a symbol of protection often worn as a pendant or hung over a home’s entrance to ward off the curse of the Evil Eye, which is believed to be inflicted by a resentful person’s envy or malevolent glare (intentionally or not). While the symbol has gained mainstream popularity over recent years, it has a rich history across many cultures dating back to ancient times.
Known as Nazar in Turkish culture, Malocchio in Italian, Mal De Ojo to Spanish speakers, and Buri Nazar, Kurdishti, and Karikannu in Indian culture (as well as many other names throughout history and different cultures), the Evil Eye holds significance all over the world. Even one of the Earth’s earliest civilizations, the Sumerians who thrived in 4000 BC, believed in the “eye of death,” which is thought to be an early version of Evil Eye.
If you or somebody you know wants to deflect negative energy brought on by somebody else’s envy or evil eye, follow along with this free Evil Eye beanie crochet pattern to handcraft a wearable ward for the colder months!

Stitch Abbreviations:
slst = slipstitch
dc = double crochet
inc = increase
st = stitch
ch = chain
You Will Need:
- Size 5.0mm crochet hook
- Weight 4 yarn in black, white, light blue, and dark blue – about 250yrd/229m total
The Pattern
Row 1
Start with black yarn.
Ch 3, slst to the first ch to create a ring (or create a magic circle).
Ch 2, dc 12 into the center of the ring. Slst to the first dc to join.

Row 2
Ch 2, dc 2 into the same st. Inc into each remaining st, then slst to the first dc of the row to join.
Row 3
Switch color to light blue.
Ch 2, dc into the same st. (Inc in the next st, dc into the next st.) Repeat () until the end of the row, then slst to the first st to join.
Row 4
Ch 2, dc into the same st. Dc into the next st. (Inc in the next st, dc into the next 2 st.) Repeat () until the end of the row, then slst to the first st to join.
Row 5
Switch to white.
Ch 2, dc into the same st. Dc into the next 2 st. (Inc in the next st, dc into the next 3 st.) Repeat () until the end of the row, then slst to the first st to join.

Row 6
*(Only increase in this row if you want a loose XL beanie. For a standard snug beanie that fits most, dc normally with no increases in this row.)
Ch 2, dc into the same st. Dc into the next 3 st. (Inc in the next st, dc into the next 4 st.) Repeat () until the end of the row, then slst to the first st to join.
Row 7 – 16
Switch yarn to dark blue.
Ch 2, dc into the same st. Dc into each st until the end of the row, then slst to the first st to join.
Row 17
Ch 2, dc into the same st. Dc into each st until the end of the row, then slst to the first st to join. Ch 1, tie off and cut yarn.

Congratulations on your brand new protection beanie! I would love to see your creation, so feel free to tag my social media if you post your Evil Eye beanie.
Looking for more free patterns? Subscribe to stay up to date and get in on more free patterns and project inspiration! Check out our shop section for more patterns and handmade items.



Leave a Reply